How to Post a Meetup Event
OPTION 1: Copy an existing draft or past event
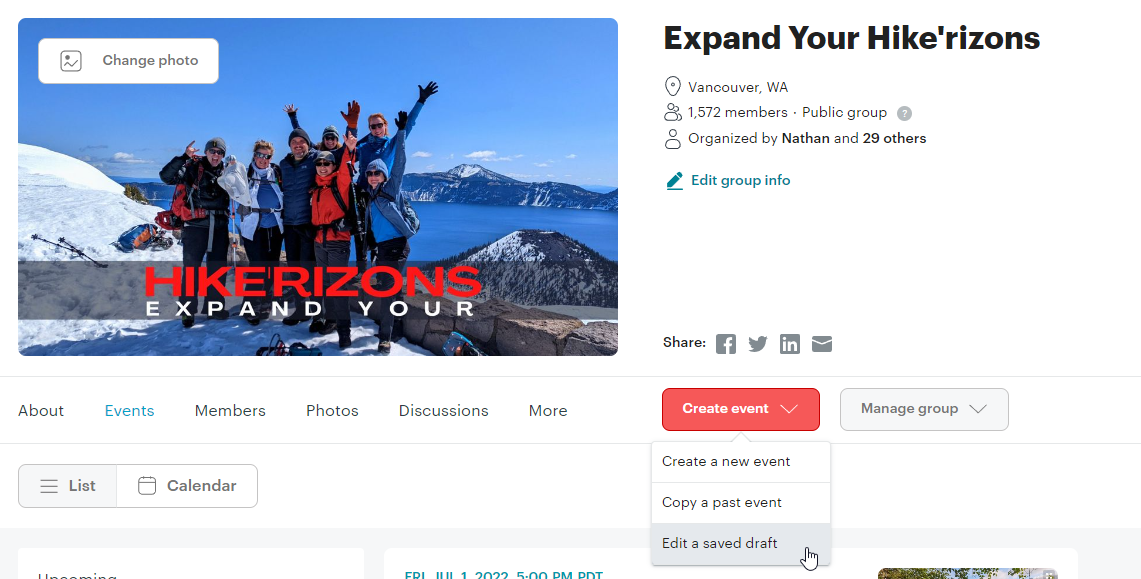
Here’s where you’ll start: https://www.meetup.com/expand-your-hikerizons
- Select “Edit a saved draft” from the “Create Event” drop down menu
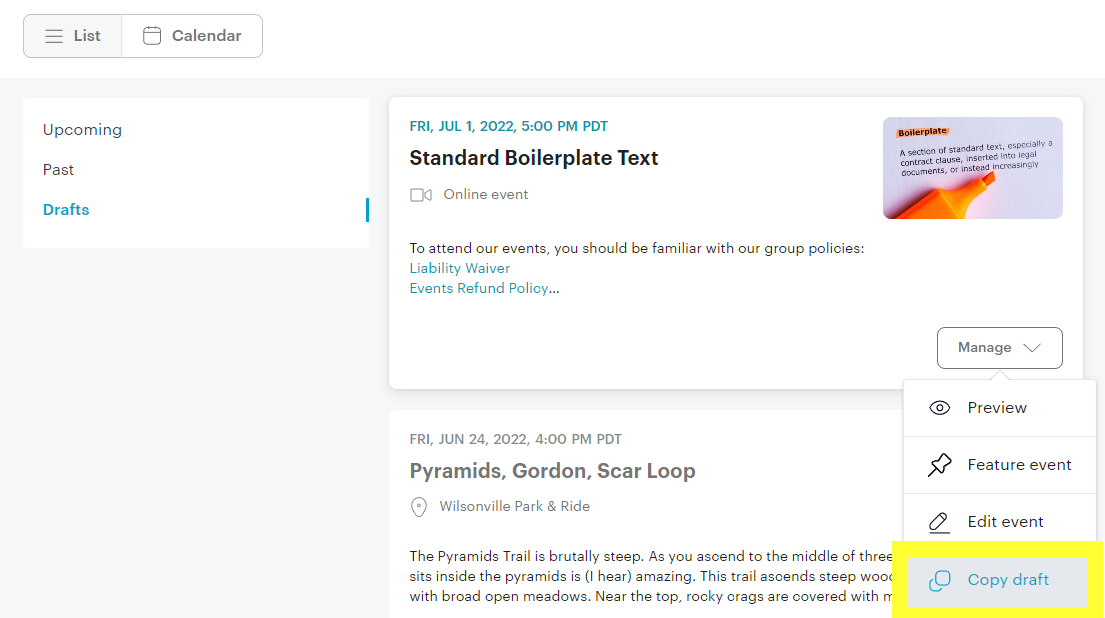
- Select “Copy draft” from the “Standard Boilerplate Text” draft option
- From here, simply update the the Title, Dates, Photo, Description, and all other relevant information. Keep the boilerplate text information under your own description if helpful
NOTE: you can also select “Copy a past event” from the same menu and then select from any event from the past. All drafts and past events are shared among leaders.
**** HERE’S AN EVEN EASIER OPTION ****
Simply copy the boilertext found below and paste it at the end of your event description :)
BOILERPLATE INFO:
To attend our events, you should be familiar with our group policies:
Please sign the liability waiver above, if you haven’t already. If you signed it for past event with this group, you don’t need to sign it again.
Our group cares more about who we are going with than where we are going. This means we won’t take off and leave you, we are very fun and social, and we hope you will join our community based-hiking and backpacking group.
Community based hiking and backpacking group? Yes, we are not destination-of-the-week based with 12 strangers, and then next week a new hike with 12 strangers.
Learn more about Expand Your Hike’rizons:
www.expandyourhikerizons.com
OPTION 2: Start from scratch
(WIP)
- Go to: https://www.meetup.com/expand-your-hikerizons
- Select: Create a new event under the “Create event” menu
- Title: Add a Title, descriptive yet short & sweet
- Date & Time: Set Date & Time (select the “end time” options if it is a multi-day trip)
- Upload a photo (if you’d like) to make your trip look more enticing
- Add a basic Event Description. We recommend adding a link to the hike description on AllTrails.com or another website so that people can read about the hike for themselves. Add any critical information that you think should be reinforced in your event description, but don’t think you need to babysit. They should be researching locations on their own. Add standard boilertext at the end of your event by simply copying and pasting the text from that section (or copy from another event with that same information). Note: Add hyperlinks by highlighting your text then selecting the chain link icon from the menu
- Venue: Add the address to the starting place / venue of location77.
- Leave the checkbox for “this is an online event” blank unless it is a webinar or some other online event
- Use the Covid section at your own discretion
- Event Hosts: Select other hosts for this trip that have agreed to co-host with you
- Optional Settings Menus (off/on): You must click on each of these options to expand their settings, which also automatically turns it to the “on” position. Turn it back it off (by dragging the icon to the left until it turns gray), if you don’t intend to use this section
- Repeat Event: If you’d like to have your event repeat (for example, every Wednesday), use this option
- Member Questions: Ask members a question that they will need to answer before they sign up for your event, if you’d like – this can be helpful for ensuring they are equipped to RSVP in the first place for some events or to simply get a question answered that you’d like to know about each of them
- Total Attendance Limit: We do recommend setting a total Attendee Limit that can be allowed on this trip. Members will be added to the Waitlist as soon as this number is reached. Some leaders find it helpful to set this number to “0” so that every person gets added to the waitlist before moving to the Going List. Make sure you inform them of this in your event description if so
- Outside Guests: If you don’t mind a member bringing an outside guest, allow it. However we discourage this for backpacking events in most cases, because we would like to know who the person is before spending a night out in the wilderness with them
- Event Fees: If your event requires a permit or some other reservation fee, you may want to charge them before they are able to get added to the Going List or Waitlist to ensure you get reimbursed ahead of time (See our Refund Policy here). We have both a Paypal & a Venmo account. Paypal is tied to Meetup event collection, but charges us a heavy fee. The Venmo account is preferred because it does not charge as a fee, but it will require you to collect funds manually.
- Preview Your Event to make sure it has what you need.
- Click Publish
- And lastly, click on Announce (to ensure that everyone gets notified about your event)


